Sugar Free BBQ Sauce

I really like condiments… mayo, mustard, ketchup, sauces, dressings… you name it and I want to dip in it or slather it on my food. Unfortunately finding condiments that taste good and also sugar free can be darned difficult.

condiments

Several years ago I worked for a local sauce and dressing bottler. Part of my job was to work R & D and I helped develop many different products. Often I was called on to “reverse engineer” a brand name product so we could replicate the flavor profile in one of our house brand products. While doing that I gained some understanding of the process as well as the “secret” ingredients in many typical condiments. Of course the one not-so-secret ingredient that was in almost everything was sugar aka: dextrose, fructose, maltose, sucrose, corn syrup, high fructose corn syrup, corn syrup solids, beet sugar, cane sugar, cane juice, brown sugar, date sugar, palm sugar, dextrin, maltodextrin, brown rice syrup, caramel, fruit juice, invert sugar, honey, maple syrup, molasses, etc. (If you think that list is long you should look into the variants of artificial sweeteners.) 

Wow. It’s everywhere and in everything… so when we started eating sugar free it was a tough assignment to find my beloved condiments without added sugar. As a result I started making my own home-made ketchup using the two “approved” sweeteners in our home: xylitol and stevia which are both all natural and very low on the glycemic index.

[Note: when using xylitol (a sugar alcohol) it may loose sweetness when cooked for long periods — it is best to add it toward end of cooking time, as noted below, to retain the sweetness. Stevia handles heat better but remember a little goes a long way.]

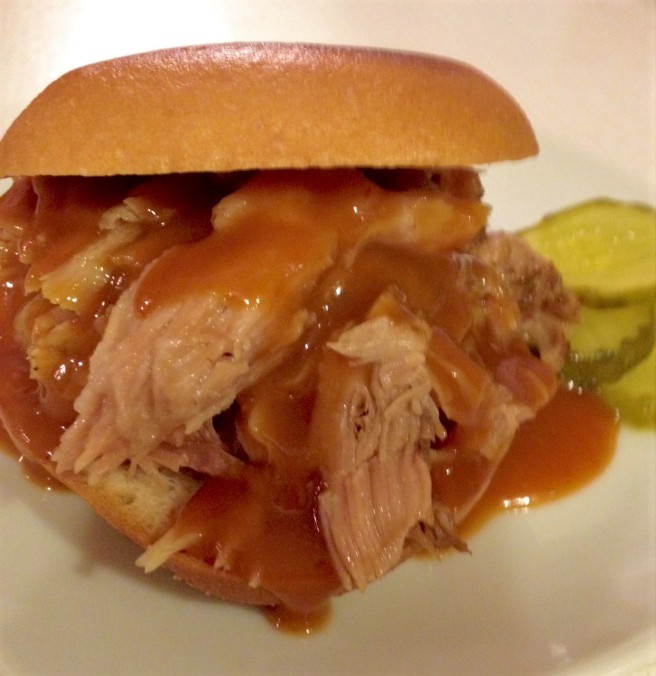
Since many home-made BBQ sauce recipes start with ketchup as a base, I decided to convert my own sugar free ketchup into a Sugar Free BBQ Sauce that we could enjoy on grilled meats, chicken, burgers, or in baked beans, pulled pork, and so on.

While we’re savoring the end of Summer and many of you are out there grilling, barbecuing, and enjoying their favorite warm weather fare – I wanted to share my Sugar Free BBQ Sauce recipe for those of you that might want to try it. 


Dan’s Sugar Free BBQ Sauce

Prep time: 10 minutes
Cook time: 30 minutes
Makes: about 3 cups

Ingredients:
1 cup Water
1 (8oz) can Tomato Sauce (check label that no sugar is added)
1 (6oz) can Tomato Paste
1/4 cup Apple Cider Vinegar (such as Bragg’s)
1/2 tsp Salt
1/2 tsp Onion Powder
1/2 tsp Stevia Powder (or to taste)
1/4 tsp Mustard Powder
1/4 tsp Paprika
1/4 tsp Black Pepper
1/8 tsp Cayenne Pepper (or to taste)
1/8 tsp Ground Allspice
2 TBSP Xylitol (added after cooking)
2 tsp Liquid Smoke (optional)

Directions:
1. In a medium sauce pan over medium heat – combine water, tomato sauce, tomato paste, vinegar and salt. Whisk to combine and bring to a simmer about 15 minutes.
2. In a small bowl combine the onion powder, stevia, mustard powder, paprika, black pepper, cayenne and allspice. Thoroughly mix spices and add to the sauce – whisking until blended and smooth. Cover and cook, stirring occasionally, for another 30 minutes.
3. When sauce is simmering and begins to reduce – turn heat to low and add the xylitol and liquid smoke (if using). Whisk to combine and let cook uncovered for another 15 minutes. Taste and adjust for salt or sweeteners to taste.
4. Serve finished BBQ sauce with your favorite grilled meats or use in recipes. To keep for later use: pour hot sauce into a clean glass container, tightly sealed, and store in the refrigerator for up to 2 weeks.


There you have it, my response to the too-much-sugar-in-the-condiment dilemma. Hope this Sugar Free BBQ Sauce is one way you can eliminate some added sugar from your own diet. Like any good sauce you can tweak the recipe for your own liking and adjust the vinegar, sweeteners, liquid smoke, etc. to your particular tastes. We serve this sauce with grilled chicken, ribs, kabobs, and even brushed on grilled veggies. We have also used it in the slow cooker for baked beans, pulled pork, and barbecued beef. It’s also great for dipping!

Until next time remember, “The Sauce Makes the Difference!”

Spanish(?) Omelette

With my new eating habits (no sugar, no grains, limited dairy), I am definitely eating lots more veggies, fruits, and lean proteins. One of the proteins that I have re-discovered is the “incredible, edible egg!” 

Eggs have had a real up and down journey in the food world… one day they’re notoriously bad for you and the next they’re reputed to be a superfood. No matter which side of the fence you stand on, you must admit that eggs are economical, convenient, versatile, easy to prepare, and pretty tasty too.

Personally I’ve always been a fan — especially for breakfast (I’ve never been a sweets for breakfast kind of guy). As I’ve mentioned in previous posts, my mom made a few egg dishes around the holidays, and my go to diner breakfast will always be a spinach and feta cheese omelette (cooked well done with crispy home fries, no toast and Red Hot on the side).

Speaking of omelettes, that brings us to today’s post… at Lista’s Italian Cuisine the menu wasn’t exclusively Italian-American fare — there were also several items that were common in most family restaurants of the day. One such item was the so-called Spanish Omelette. At Lista’s the Spanish Omelette wasn’t a breakfast item; it was featured on the dinner menu (oddly under the sub-heading of MEATS). The dish consisted of a 3-egg omelette blended with Romano cheese and seasonings then filled with stewed peppers, onions, and tomatoes and served with a side of fried potatoes (or a side of spaghetti if desired). Frankly, it was a very tasty dish — if not a bit mundane for having such an “international” moniker. 

It wasn’t until many years after Lista’s closed its doors that I learned a true Spanish Omelette (Tortilla Española) was a very different dish altogether. Authentically a Spanish Omelette is made with thinly sliced potatoes (and often sliced onion) seasoned with salt, cooked in olive oil, and then blended with beaten eggs and finished slowly in the pan (or oven) until fully cooked and nicely browned on both sides. Tortilla Española is often served cold or room temperature, cut into small wedges or squares, and eaten as a finger food, appetizer or tapa.

Either one of these Spanish Omelettes would satisfy my current healthier diet with no sugar or grains and only a hint of sheep milk Romano cheese in the one. In our house, omelettes can be a nice change from the usual rotation of chicken/fish/turkey/beef… and as mentioned above, an economical alternative for breakfast, lunch, or dinner. So I am giving you the original Lista’s Spanish Omelette and my recipe for a more traditional Tortilla Española — you decide which one works for you.


listaspanishomelette

Lista’s Spanish Omelette

Prep time:  15 minutes
Cook time:  15 minutes
Makes:  1 meal size omelette

Ingredients:
1/2 Green Bell Pepper – sliced
1/2 Red Bell Pepper – sliced
1/2 Medium Onion – sliced
1 Medium Tomato – seeded and chopped (or 1/4 cup Tomato Sauce)
2 TBSP Olive Oil – divided
3 Large Eggs – beaten
2 TBSP Grated Romano Cheese
Pinch of Garlic powder
Pinch of Paprika
Salt & Pepper – to taste

Directions:
1. In a medium saute pan or skillet cook the peppers, onions, and tomato in 1 tbsp oil until peppers are tender about 10 minutes. Remove from heat, season with salt and pepper, cover to keep warm.
2. Whisk the eggs, Romano cheese, salt, pepper, garlic and paprika in a small bowl until frothy.
3. Heat a second medium skillet or omelette pan over med-high heat and add 1 tbsp olive oil. When the oil is shimmering, swirl to coat entire pan and pour in the egg mixture. Tilt pan in all directions to allow eggs to cover entire bottom of pan. Allow to cook for 1-2 minutes until bottom starts to set – then using a rubber spatula pull the edges toward the middle allowing liquid egg to flow back into the empty space. Lower heat to med-low and allow to cook until almost set, about 5 minutes.
4. Spoon 3/4 of the prepared peppers and onions onto one half of omelette, carefully fold other half over the filling and allow to cook another 1 minute. Carefully turn the omelette over and finish cooking another 1-2 minutes until cooked through.
5. Slide the omelette onto a plate and top with remaining 1/4 peppers and onions and a sprinkle of Romano cheese if desired. Serve as is or with a side dish.


TortillaEspanola

Traditional Spanish Omelette (Tortilla Española)

Prep time:  15 minutes + cooling time
Cook time:  20 minutes
Makes:  1 meal size omelette or 3-4 appetizer servings

Ingredients:
4-6 Small Potatoes – cooked, cooled and sliced
1/2 Medium Onion – sliced
2 TBSP Olive Oil – divided
3 Large Eggs – beaten
1 TBSP Water
Salt & Pepper – to taste

Directions:
1. In a medium sauce pan boil potatoes in enough water to cover until fork tender about 10 minutes. Remove from heat, drain and allow to cool enough to handle. Slice into 1/2 inch rounds.
2. Heat a heavy 8 inch skillet (cast iron can be used) over med-high heat. Add 1 tbsp olive oil and swirl to coat pan. Add sliced potatoes and onions to hot pan and press down with a spatula. Allow to cook undisturbed until potatoes are starting to brown and onions are translucent, about 5 minutes. Stir onions and potatoes gently and spread out to cover bottom of pan. Cook another 1-2 minutes. Season generously with salt and pepper.
3. 
Whisk the eggs with 1 tbsp water in a small bowl until frothy. Pour over potatoes and onions – tilting pan to allow eggs to flow into all the spaces and cover the potatoes completely.
4. Reduce heat to med-low, cover pan and allow to cook until set and slightly brown – about 5 minutes.
5. Gently loosen the omelette from the pan using a rubber spatula. Slide omelette onto a plate and then slide back into the pan with the potatoes facing up. Continue to cook until fully cooked through and slightly brown on bottom. Season with salt and pepper to taste.
6. Remove from heat and serve hot, room temperature, or cold – as a light entree with a salad – or cut into wedges as an appetizer.


There you have it, two great egg-based dishes that can be enjoyed any time of day. Whether feeling nostalgic for the original Lista’s Restaurant version… or trying the tried and true traditional version (there’s a nice bit of alliteration for you) — you can’t go wrong with a Spanish Omelette. 

Thanks again for reading my blog — your “likes” and comments are always appreciated.

Until next time remember, “The Sauce Makes the Difference!”

Pizza Then & Now

It seems a new page has turned in the culinary chapters of my life. Not really new I suppose, as it has been turning for a few years now.

While I have really enjoyed writing about and sharing with you the stories and recipes from my days growing up in the family restaurant at 74 Main Street… right now  I am not preparing and eating many of those classic Italian-American dishes. As I have explained in the past, my wife has some food intolerance that prevents her from enjoying grains, dairy, and sugar. To support her and my own health (and since I am the primary cook in our home) I too have been eating differently and much “cleaner” the past few months.

Because of this, it will become increasingly difficult to feature pasta dishes, fried cutlets, cheesy casseroles, desserts, and many other family or regional favorites on this blog since I prefer not to write about recipes that I am not personally preparing and photographing for my posts. 

So, with all that in mind, I have decided to use 74 Main Street to showcase some of the recipes I have learned, developed or created to meet our new eating habits. Of course I will gladly feature any Lista’s Restaurant recipes that work within our dietary constraints.

And since we all take risks to provide some small pleasure in life there will be occasions that a moderate amount of dairy will infiltrate some of these posts… after all you can’t abstain from mozzarella forever.

So that brings me to today’s post Pizza Then & Now:


We didn’t have pizza on the menu at Lista’s Italian Cuisine so I grew up eating pizza from one of the few locally owned pizzerias in Brockport, NY. These establishments were old school, Italian-American owned, take-out places that sold a pie that was unique to this part of New York — recently referred to as “Rochester Style” pizza — with a thicker, chewier crust with a hard bottom and wide rim… a slightly sweet, oregano laced sauce… and traditional toppings that were fresh made and generous. My family almost exclusively ordered pizza from Tony’s on Main Street (just a block from our house on Holley Street), but in the early days there was also the original Pontillo’s situated next door to our restaurant (where I was paid a penny for each pizza box I assembled), and later Papa Joe’s right across the street (and actually for a short time in the late 70’s housed inside Lista’s at 74 Main). In my opinion, I don’t think you can find a pizza as good as the ones we ate back in the 60’s and 70’s. 

Still, times have changed, and now I only eat pizza I make at home and it’s very different from what I remember…

It was a transition going from a traditional flour based, yeast-raised pizza crust to a frozen cardboard-thin gluten free pizza crust to a home-made cauliflower pizza crust. But after some experimenting and adjustments, I think the cauliflower crust comes out pretty darn good and being able to enjoy pizza again has been worth the efforts.

Cauliflower is one of those foods that has become a popular substitute for other foods deemed less “healthy” or “good for you.” We now see recipes for cauliflower mashed potatoes, cauliflower rice, cauliflower mac and cheese, cauliflower tater-tots, cauliflower hummus, and of course cauliflower pizza crust. Now I won’t judge if you still choose to eat and enjoy the real version of any of these cauli-foods but if you haven’t tried it – don’t knock it!

Notes:

Nutritional yeast is a deactivated yeast (it won’t ferment) that is used as a flavoring (it has a cheesy, nutty taste when used in recipes) or as a nutritional supplement (rich in some B complex vitamins). I have found that in some recipes it lends a cheesy umami flavor that fills the void when you are eliminating dairy. 

We choose to limit cow’s milk products and typically only use sheep or goat milk cheeses. The recipe calls for Pecorino Romano cheese (our favorite) which is traditionally made from sheep’s milk but check the label. You could use goat cheese (chevre) with the same results but a stronger flavor profile. (And as mentioned above we will use mozzarella on our pizza as an occasional splurge.)


Dan’s Cauliflower Pizza Crust

Prep time: 20 minutes
Cook time: 30-60 minutes in oven + 10 minutes cooling
Makes: one 12 inch crust or two 6 inch personal crusts

Ingredients:
For crust:
1 1/2 lbs. Prepared Cauliflower “Rice” (I used frozen) – briefly cooked and cooled
1/4 cup Ground Flax Seed
1/4 cup Pecorino Romano Cheese (made from sheep’s milk) or Goat Cheese (chevre)
2 TBSP Nutritional Yeast
2 Whole Eggs – beaten
1/2 tsp Baking Powder (optional)
1/2 tsp Oregano (or Italian Herb Blend)
1/2 tsp Garlic Powder
1/4 tsp Black Pepper
1/4 tsp Salt (optional)
For topping:
1 cup Prepared Pizza Sauce
2 cups Shredded Mozzarella
Sausage, Pepperoni, Peppers, Onions, Mushrooms, Olives, Anchovies, etc. (to taste)

Directions:
1. Preheat oven to 400 degrees F. Place rack in center of oven.
2. Place cauliflower rice (fresh or frozen) in a microwave safe dish and microwave on full power 3 minutes, stir and microwave another 3-5 minutes until cauliflower is steaming. Remove from microwave, stirring occasionally, until cool enough to handle.
3. Place cooled cauliflower in a clean cotton kitchen towel (I use “flour sack” towels for this) – pull corners together around cauliflower to make a pouch and squeeze out as much liquid as possible (you’ll get a lot so keep squeezing). Place “dry” cauliflower in a mixing bowl.
4. Add remaining ingredients and mix thoroughly until a “dough” forms. Let rest about 5 minutes.
5. Prepare a 12 inch pizza pan with cooking spray or light coating of olive oil. Place cauliflower dough in center of pan and using fingertips spread the dough into a crust approximately 1/4 inch thick covering the whole pan. Make sure there are no holes in crust and it is an even thickness.


The next 3 steps are how I do it… it’s a bit time consuming but I find the resulting crust has a drier, chewier texture more like a traditional pizza crust. You can skip the flipping part and just bake the crust for the whole time – but I found the result weren’t as good.


6. Place prepared crust in preheated oven and bake for 15 minutes until top looks dry and edges are slightly brown. Remove from oven and allow to cool for 10 minutes.
7. Carefully loosen the crust from the pizza pan using a metal spatula or other utensil. Place a sheet of parchment or foil over the crust and flip it over onto counter. Then slide it back onto pizza pan. Return to oven for another 15-20 minutes until edges are browned and crust is firm to touch. Remove from oven.
8. Top the crust with your favorite sauce, cheese, and toppings. Bake for an additional 10-15 minutes until toppings are hot and cheese is melted and slightly browned. (You can also broil it for a few minutes if you like a browned look to your toppings.)
9. Remove from oven, cut into wedges with a pizza wheel or sharp knife and serve.


There you have it, my version of the newly popular Cauliflower Pizza Crust. Although there are many recipes out there (and admittedly mine isn’t any easier to make) I like to think this one is maybe a bit “healthier” and at least has one short-cut using the prepared cauliflower ‘rice’. And I hope you give it a try… no it can’t hold a candle to traditional locally made Italian-American pizza – but it tastes pretty darn good and, at least for me and my family, we know it meets our new dietary goals. 

Until next time remember, “The Sauce Makes the Difference!”

Leftover Roast Beef & Vegetable Soup

I don’t often make roast beef for my family since we’re not big red meat eaters. Although, admittedly, we all enjoy a good steak on the grill or an occasional chuck roast in the crock pot. The exception tends to be around the Christmas holiday when the Thanksgiving turkey is still a close memory and ham or lamb wants to be reserved for the Easter table. Christmas just calls for a beautiful roast beef. At times we splurge on a impressive Prime Rib or succulent Tenderloin, but this year we chose a humble Eye of Round for the main event. Roasting beef can be troubling since you want to turn out a tender, juicy and flavorful roast — and oven roasting can dry out the very lean eye of roast. I decided to go with the tried and true “high-temp method” to cook my roast. 

eyeroundroast


Here’s what I did:
1. I prepared my 6 pound roast the night before by removing the store packaging and patting off all moisture (blood) with paper toweling. Then placed the roast, fat side up, in a roasting pan – covered it with parchment paper (tucked in around the roast) and placed it back in fridge overnight.
2. Two (2) hours before it was time to cook (11:00 am for me), I took the roast out of the fridge to bring the meat to room temperature (this provides a more even cook throughout).
3. After 1 1/2 hours (12:30 pm), I preheated my oven to 500 degree F. [Note: this method requires a modern oven with a digital setting and a tight door seal.] I uncovered the roast and brushed it with olive oil, then seasoned with kosher salt, fresh ground black pepper, freshly minced garlic (4 cloves) and a sprinkle of dry rosemary.
4. When ready (1:00 pm) I placed the seasoned roast in the preheated oven and roasted it at 500 F for 36 minutes (6 minutes per pound). Leaving the door closed, I turn the oven to 350 F for another 30 minutes (this was approx. 2:00 pm), then shut the oven off and left the roast in for 2 hours (DO NOT OPEN THE DOOR). You can insert a meat thermometer or temperature probe in the roast so you can monitor the cook — or just do it on ‘blind faith’ like me and hope for the best.
5. After the 2 hours (4:00 pm), I removed the roast from the oven, tented tightly with foil, and let it rest for 30-40 minutes while I finished the rest of the meal. 
6. When everyone sat down to eat we had a beautiful roast, perfectly pink (med-rare) throughout, juicy and tender with a nice brown crust on the outside and a deep beefy flavor.  Delicious!


This high-temp method of roasting reminds me of the days I worked in banquets and catering during the late 80’s and 90’s. I roasted lots of beef back then, everything from enormous steamship rounds, standing rib roasts, and whole rib-eyes — to commercial top rounds, briskets, and tri-tips. One of the ways we ensured that the beef didn’t get over done (most people want some pink in their beef) was to slow cook the roasts. We often started in a very hot oven to “burn the fat cap” and give the roast a nice caramelized outside (which created the best au jus and gravy) and then finished the cooking at 200 degrees F. At a couple places I worked we would roast up to 30 whole rib-eyes at one time in Alto-Shaam holding ovens (a kind of big metal box with heating elements and shelving) at 190 degrees F all day and they still came out beautifully pink and tender.


Roast beef also reminds me of my early food service days when leftovers were never thrown out but were always… and I mean always… used up in the daily soup selections. So that’s why I titled this post Leftover Roast Beef & Vegetable Soup because I made a nice soup from the tail end of the roast and wonderful au jus that was left after Christmas dinner.

As I’ve mentioned before, my Dad, Vinnie Lista was known for his soups, bisques, and chowders at Lista’s Restaurant. One of his personal favorites was beef barley soup but it was only made when there was leftover roast beef on hand (which thankfully was often). There was more of a “formula” than a recipe when making soups at Lista’s which gave license to improvise ingredients if something was in surplus or short supply. With that in mind we most always started broth based soups with mirepoix (carrot, onion, celery) and a good strong stock. After that it was up to Dad’s culinary whims to produce the final product.

In that same vein, I made a delicious Beef & Vegetable Soup based on some surplus, some basics, and whatever else I had on hand. Like all homemade soup recipes the skies the limit when it comes to adjusting to personal tastes. So start with the basic “formula” and feel free to add or subtract ingredients as it meets your pantry or family’s needs.

beefvegsoup


Leftover Roast Beef & Vegetable Soup

Prep time:  30 minutes
Cook time:  40 minutes
Serves:  8-12 servings

Ingredients:
1 TBSP Olive Oil or Beef Fat from leftover roast
1 lb. Leftover Roast Beef – cut into 1/2 inch cubes

1/2 medium Rutabaga – peeled and cut in 1/2 inch pieces (about 1 cup)
1 med Yellow Onion – peeled and 1/2 inch dice
3 ribs Celery – sliced crosswise in 1/2 inch pieces
3 cloves Fresh Garlic – chopped
4 med Carrots – peeled, cut lengthwise and sliced in 1/2 inch pieces
2 qts. Beef Broth/Stock – 
good quality homemade or store bought
1 (15.5 oz) can Diced Tomatoes with juice
1/2 cup Pearl Barley (optional)
1-2 Bay Leaves
1 cup Frozen Cut Green Beans
1 1/2 cups Cauliflower Florets (small)
Salt & Pepper – to taste

Directions:
1. Prepare the beef and vegetables before starting soup.
2. In a 6 quart covered pot or dutch oven, heat oil or fat over med-high heat. Add diced leftover roast beef, diced rutabaga, diced onion, sliced celery, and chopped garlic. Cook and stir until garlic is fragrant and vegetables begin to soften – about 10 minutes.
3. Add carrots, beef broth, diced tomatoes with juice, pearl barley (if using) and bay leaf. Bring to a low boil, reduce heat to low, cover and simmer for 20 minutes until vegetables are tender.
4. Add frozen green beans and cauliflower, increase heat to medium and bring back to a simmer. Cook for 10 minutes until barley and cauliflower are tender. Turn off heat – season with salt and pepper to taste – and remove bay leaf.
5. Serve soup ladled in bowls with a hearty multi grain bread on the side.

Notes: Potatoes can be substituted for the Rutabaga (if you’re not a fan)… just add them later with the green beans and cauliflower. Barley is optional (we are Gluten Free and can’t eat it) but it does add a nice texture to the soup and enhances the broth. Feel free to add or substitute vegetables to suit your taste.


There you have it, a nice home-style Leftover Beef & Vegetable Soup for a cold winter evening meal. I hope you enjoy this recipe — and I hope you think twice before tossing out those leftovers.

Until next time remember, “The Sauce Makes the Difference!”

Slow Cooker Pulled Pork

pulledporksandwich

Pulled Pork Sandwich with Carolina Style BBQ Sauce

If you eat pork, then most likely you have had a “Pulled Pork” sandwich at some time or another.

The roots of Pulled Pork can be traced to the southeastern coastal states where indigenous peoples were slow smoking game over open fires to help preserve the meat. Early Spanish settlers adapted the method using cheap and easy to maintain pigs as the main protein source. As more people came into the areas they added their own cultural tastes with seasonings and condiments until each region had its own cooking style and sauce preference. Still one thing is common to all — the use of the low and slow cooking method.

Now that Pulled Pork is enjoyed all over the country, many home cooks have found that one sure fire method of achieving low and slow cooking is using their trusty ‘crock pot‘ or slow cooker. 

So why am I writing about slow cooker Pulled Pork… and does it have anything to do with Lista’s Italian Cuisine? Not much — but I recently chatted with a co-worker about her slow cooker Pulled Pork disaster and thought I could share some of my experience and methods and maybe help some of you have a successful Pulled Pork experience (after all it’s a popular food served during the football season).

But first let me reminisce. Not about Lista’s Restaurant, but about my very first experience eating Pulled Pork nearly 30 years ago. We were attending the Renaissance Faire in Sterling NY with some friends and while walking around, taking in all the sight and sounds, I first smelled — and then saw a vendor selling pork sandwiches and I decided I had to have one. The sandwich consisted of barbecued  Pulled Pork topped with pineapple coleslaw stuffed into a pita pocket. It had some clever (Faire appropriate) name which I can’t recall… but the taste was amazing and I still remember how tender and juicy the pork was and how the tangy sauce and crunchy coleslaw complimented it so well. And I couldn’t wait to figure out how to make it myself. And that’s when I started learning how to make delectable Pulled Pork and the various cooking methods out there.

Although I have tried different ways to make my Pulled Pork at home, by far my favorite and easiest method is to use my trusty slow cooker. For me, using the slow cooker is not only convenient it saves energy (some studies say half the cost of a conventional oven). And slow cookers are considered safe to leave unattended for long period (assuming there are no defects such as a damaged cord or heating element) and that allows me to use my time for other things… like writing this blog.

When making Pulled Pork you need the right cut of pork, and by far the most popular, economical, and flavorsome cut is the pork shoulder or “Boston butt” roast. The shoulder roast comes from the upper shoulder (the lower portion is called picnic) and is sold both bone-in and boneless (I prefer bone-in because it imparts more flavor) and is generally found to weigh from 5 to 12 lbs. The shoulder  has a combination of leaner “light” meat and fattier “dark meat” in the same roast. This combination provides the needed moisture to keep the meat tender during the long cooking process — and it gives the final dish a nice even texture and flavor. 

The pork shoulder roast will also have a “fat cap” or layer of white fat covering one side… and that’s a good thing since this fat is what keeps the Pulled Pork from drying out during the slow cooking. When you’re done cooking you can very easily remove the excess fat before shredding it for serving.

At our local grocery chain you can buy a very nice bone-in pork shoulder roast at an extremely reasonable price year round, however, the roasts are often too big for some families and they end up buying a smaller roast at a much higher price. Here’s a tip: buy the larger roast and take it to the meat counter and ask to have it cut in half, which they will gladly do at no extra charge. Now you have two smaller roasts at the lower price and you can cook one immediately and freeze the other for another time.

Now that you know what to buy, you need to know how to cook it. The recipe below is my go-to way of making tender, juicy Pulled Pork in a slow cooker. My slow cooker holds 7 quarts so it can accommodate a large roast.  I like to season my pulled pork very simply with kosher salt and freshly ground black pepper — but you can add a complex rub (homemade or store bought) and/or aromatics (garlic, onions, herbs, bay leaf, etc.) if you want. I do add some broth to the slow cooker and often 1-2 teaspoons of liquid smoke flavoring. You can add whatever liquid you prefer water, beer, cola, etc. and it will still cook the same — only the flavor profile will change.


Slow Cooker Puller Pork

Prep time:  10 minutes
Cook time:  6 hours 
Serves:  about 16 servings

Ingredients:
8 lbs Bone-in Pork Shoulder Roast
1 -2 TBSP Kosher Salt
1 TBSP Freshly Ground Black Pepper
2 cups Beef Broth
1-2 tsp Liquid Smoke Flavoring (optional)
Cooking Spray – as needed

Directions:
1. Remove roast from packaging, rinse and pat dry with paper towels.
2. Poke the roast all over with a carving fork or small sharp knife. Season generously on all sides with salt and pepper (or whatever seasoning you choose).
3. Spray crock of slow-cooker with cooking spray (or use a slow-cooker liner). Pour broth (or other liquid) into crock, add liquid smoke if using and stir. Place the seasoned roast fat side up in crock, cover and set to high. (Make sure the slow-cooker is plugged in!)
4. Cook on high for 3 hours and then cook on low for 3 more hours (if you want to cook while you’re at work, etc. cook on low the entire time). You might want to turn the roast over after 4-5 hours to ensure even cooking – but this is not necessary.
5. After 6 hours the roast should be fork tender and bone easily removed. If not continue to cook for 1-2 more hours.
6. Carefully remove whole roast and place fat side up on large platter or rimmed baking tray. Using tongs remove the bone and discard, remove as much of the excess fat as possible and discard. Using tongs or a couple of forks, gently “pull” the meat apart into shreds or small bite-size pieces. Add some of the cooking liquid if you want to have the Pulled Pork moister (especially if you are serving it without added sauce).
7. Serve as is, or on rolls — adding your favorite style BBQ sauce, gravy or condiments.


After I cooked my Pulled Pork I decided to use some of it to make a version of a “Cuban” sandwich similar to one served at a popular local BBQ joint. This is by no means an authentic Cubano but it came out pretty tasty and was a nice change from a typical Pulled Pork on a roll with sauce.

pulledporkcubano

Dan’s Pulled Pork “Cubano

Prep time: 10 minutes
Cook time: 10 minutes
Serves: 2

Ingredients:
1 cup Leftover Pulled Pork (with out sauce)
4 slices Deli Smoked Ham
4 slices Deli Swiss Cheese
1/4 cup Dill Pickle Slices
1-2 TBSP Softened Butter
2 Sandwich Rolls (split) or 4 slices Good Quality Bread (we used Gluten Free)
2 TBSP Mayo
1 TBSP Yellow Mustard
Pinch of Cayenne Pepper

Directions:
1. First, blend the mayo, mustard and cayenne in a small bowl. Spread this evenly over the cut sides of the rolls.
2.  Next layer the other ingredients on the two roll bottoms in this order: one slice Swiss cheese, 1/2 cup pulled pork, 2 slices ham, a few dill pickle slices, then another slice of Swiss cheese. Place the roll top over the filling and spread a little butter on the outside of the roll.
3. Heat a skillet over medium heat until hot. Place the two sandwiches side by side with the buttered top down on the hot pan. Spread a little butter on the bottom of the sandwiches and place a weight on them to press them down while they cook. [You can use a foil wrapped brick, another heavy skillet – like cast iron, or one of those sandwich presses that sometimes come with a grill pan.]
4. Grill the sandwiches until they are brown and crisp on the one side, then flip them over and press them down to grill the other side until it is crispy and the filling has warmed through.
5. Remove sandwiches from pan, cut at an angle and serve with some plantain chips.


So there you have it, a basic recipe for making delicious Pulled Pork in your slow cooker and a variation on a classic “Cuban” sandwich to help utilize some of the leftovers. If you’ve struggled making Pulled Pork or if you’ve never attempted it, I think this simple method will yield great results.

Until next time remember, “The Sauce Makes the Difference!”

Spinach & Feta Meatloaf

One of my best-loved weekend treats is to go out for breakfast to any of the numerous local diners. I am a big fan of breakfast food, especially omelettes, and no matter which local diner I choose I’m confident they will have my go-to favorite Greek omelette made with spinach and feta cheese. So recently after having breakfast with my wife and father-in-law, it was my favorite breakfast that inspired me to make this Spinach & Feta Meatloaf for dinner.

Although meatloaf is one of my favorite nostalgic foods, truthfully I don’t make it very often. Once in a while, when inspired to put together the classic ground-meat meal, I generally follow my Dad’s traditional recipe from Lista’s Italian Cuisine (see my post from October 6, 2017). This time, however, I wanted to try a stuffed meatloaf and so the Spinach & Feta idea came to mind.

This wasn’t the first time I’ve filled a meatloaf with veggies and cheese… actually a stuffed meatloaf was one of the very first recipes I made for my family when I was a kid. Most likely the recipe came from one of the PBS cooking shows I watched, or from a ladies magazine I browsed while waiting for my mom to have her hair done. Back then I made a meatloaf that was layered with cheddar cheese and chopped broccoli and baked in a ring mold. It was pretty unorthodox for our family to eat the broccoli and cheese inside the meatloaf… kind of “high class” eating such fancy meatloaf in the Lista house. But the recipe was a hit and I made it several time over the years.

Since then I’ve done some wonderful things with the humble meatloaf but I think this Spinach & Feta pinwheel will be a “crown jewel” in my meatloaf repertoire.

Using a basic meatloaf combination of ground beef, eggs, breadcrumbs and seasonings, I formed a large rectangle 15″ x 18″ on some parchment paper, topped it with frozen chopped spinach (thawed and squeezed dry), crumbled feta cheese, and sliced kalamata olives (just because we like them so much). Then I rolled it up jelly-roll style and baked it. After letting it rest for a few minutes out of the oven, it sliced beautifully, and tasted great! I used 90% lean ground chuck, but this could also be made with ground turkey or meatloaf mix (beef, veal, pork) or your preferred ground meat combo. I think next time I’m going to try a beef and lamb combination.

We love, love, love olives… but if you’re not particularly fond of olives, this would be equally delicious without them — instead try substituting diced roasted red peppers which would be perfect in this dish. Using fresh spinach instead of frozen would also be very nice (I just didn’t have any on hand that day). 

As an afterthought, I decided to make a horseradish, mayo and sour cream condiment to serve on the side which added a nice sharp, creamy addition to the Greek inspired flavors.


Spinach & Feta Meatloaf

Prep time:  20 minutes
Cook time:  45-60 minutes + resting time
Serves:  8-10 servings 

Ingredients:
2 lbs 90% lean Ground Beef (or alternate ground meat(s)
3 Eggs
3/4 cup Dry Bread Crumbs
1 TBSP Dry Parsley Flakes
1 tsp Dry Oregano
1 tsp Salt
1 tsp Freshly Ground Black Pepper
1 tsp Paprika
1/2 tsp Garlic Powder
16 oz package Frozen Chopped Spinach – thawed
8 oz Feta Cheese – crumbled
1/2 cup Kalamata Olives – sliced or chopped

Directions:
1. Preheat oven to 350 degrees F and coat a 9×13 inch baking dish with cooking spray.
2. In a large bowl combine ground beef, eggs, breadcrumbs, parsley, oregano, salt, pepper, paprika, and garlic powder — mix with clean hands (or disposable gloves) until fully combined.
3. Put thawed spinach in a colander or sieve and squeeze out the excess moisture.
4. Place a large sheet of parchment paper on work surface, pat out meatloaf mixture on the parchment into a roughly 15″ x 18″ rectangle – press down firmly to remove any air pockets to ensure meatloaf will hold while rolling. Evenly top the meat mixture with the chopped spinach, then sprinkle the chopped feta evenly over spinach, and finally sprinkle the sliced olives over the feta.
5. Starting a the narrow end, carefully roll meatloaf “jelly roll” style 
(use parchment to help lift and roll meatloaf as needed) into a tight cylinder – sealing ends [see photos 1 & 2 above].
6. Place meatloaf roll in the prepared baking dish and place in the center of preheated oven and bake for 45-60 minutes until fully cooked and a thermometer inserted in the center of meatloaf reads at least 165 F. Remove from oven and allow to ‘rest’ for about 15 minutes.
7. Using a serrated knife (like a bread knife) gently slice the meatloaf into 1″ slices and serve with your favorite side dishes (I served roasted Brussels sprouts and sweet potato fries). Serve horseradish sauce on the side if desired.


Quick Horseradish Sauce (5 minutes / yields 1 cup)

Ingredients: 1/2 cup mayonnaise, 1/2 cup sour cream, 2 TBSP prepared horseradish (or to taste), salt and pepper to taste (optional).
Directions: Whisk together ingredients in a small bowl, season with salt and pepper if desire. Chill for 30 minutes to blend flavors.


There you have it, Spinach & Feta Meatloaf inspired by my favorite diner breakfast. I hope you try this delicious Greek inspired recipe and add something new to your own meatloaf repertoire!

Until next time remember, “The Sauce Makes the Difference!”

Escarole & Beans

greensbeans

For what ever reason (tradition, habit, nostalgia) for as long as I remember there were seasons of foods in my family. Spring was a time for lighter fare reminiscent of the awakening world around us; Summer was grilling, picnic salads and simple, quick meals to sustain those on-the-go days — then as the colder weather of Fall set in we turned toward more satisfying, carb-filled “comfort foods” like hearty soups, pasta, and casseroles… eagerly followed by the festive fare that goes along with the Holidays… and so on into Winter with its rich roasts and stews. With all that in mind, I recently whipped up a batch of a classic Italian-American comfort food Escarole & Beans otherwise known as “greens and beans.” 

I’ve mentioned before, in our house growing up, “greens” usually meant escaroleOther greens like spinach, Swiss chard, mustard greens or beet greens were eaten occasionally as a side dish (and always sprinkled with vinegar) — my Grandma or Great-Aunt also cooked up dandelion greens and broccoli rabe from the back yard — but kale was not even on our radar. As a matter of fact, I’d never heard of kale until I was working in food service in the 80’s and kale was used exclusively as a decorative element lining salad bars and food trays (kale is such a hearty vegetable that we often re-used it over and over). And collard greens didn’t become part of my diet until the advent of the BBQ restaurant trend in the 90’s. Despite the limits to our greens repertoire… the Lista family enjoyed them fairly often.

Even my non-Italian maternal Grandfather, “Grampa Gailor” would cook up what he called “break greens” (I suspect they were fiddle head ferns) that he gathered up every spring “down by the creek” while fishing. He would bring home a big bunch of these ferns and cook them in his old cast iron skillet (which he never washed) with bacon grease (from the coffee can by the sink) and some “Eye-talian” seasoning. Talk about comfort food!

So getting back to Escarole & Beans… for me this is a perfect cold weather meal for a work day. It goes together quickly, can be easily adjusted for more people, can be as mild or spicy as you want, and gives you that comfort food unctuousness without having a lot of added fat. The beans and Romano cheese give this dish a creamy melt-in-your-mouth feel while the escarole provides substance and just a hint of bitterness in contrast.

Although I have traditionally made this with chicken broth, feel free to use readily available vegetable broth — leave out anchovy and cheese for the vegan folks. If you want to make this more of a soup, just add additional broth (about 2-3 cups).

If you’re looking for an added element to make this dish even more substantial — try adding some sliced cooked Italian sausage with the beans (one of my favorite ways to make it). To “fancy it up” for serving guests try toasting some coarse breadcrumbs in a skillet with a little olive oil, mix in some fresh chopped parsley and Romano cheese… put the finished Escarole & Beans in an oven proof serving dish and sprinkle the bread crumb mixture over the top — pop under the broiler for a minute or two and serve. 


Escarole & Beans

Prep time:  15 minutes
Cook time:  15 minutes
Serves:  4

Ingredients:
1/4 cup Olive Oil

3 cloves Garlic – chopped
3 Anchovy Fillets (optional)
1 pinch Crushed Red Pepper
1 large head Escarole – washed, trimmed, and cut into 1 inch pieces
3/4 cup Chicken or Vegetable Broth
1 (16 oz.) can Cannellini Beans – rinsed
Salt and Black Pepper – to taste
¼ cup grated Pecorino Romano Cheese (plus more for topping)
Crushed Red Pepper for topping (optional)

Directions:
1. Heat oil in a large deep skillet with lid over medium heat. Add the garlic and cook for about 30 seconds. Add the anchovies and red pepper and cook until the anchovies break down about 2-3 minutes.

2. Add in the broth and beans and bring to a simmer. Add the escarole to the pan and stir until the wilted about 2 minutes. Place the lid on the pot and cook for about 10 minutes or until some of the liquid is reduced. Turn off heat.
3. Uncover and stir in the Roman cheese, cover and allow to rest for about 2-3 minutes before serving.
4. Serve in shallow bowls, top Escarole & Beans with additional Romano cheese and a pinch of red pepper (if desired). Serve with good, crusty Italian bread or rolls for sopping up the sauce.


There you have it, Escarole & Beans, a quick and easy classic Italian-American comfort food dish to warm you up on a cold, rainy fall afternoon. I hope you cook and enjoy this version sometime soon.

Until next time remember, “The Sauce Makes the Difference!”

Famous Cornell Chicken

I’ve been wanting to write a post about the Famous Cornell Chicken sauce for quite some time… but then I haven’t made any sauce or grilled any chicken in quite some time. However, since my wife leads the local Cornell Cooperative Extension and they recently had their annual Famous Cornell Chicken BBQ fundraiser (for which I volunteered 8 hours just to get my free chicken dinner) — I decided that it was high time I whipped up some sauce, got some chicken quarters, and grilled up some moist, juicy, super flavorful Famous Cornell Chicken at home!

For the uninitiated, Cornell University, an Ivy League university located in Ithaca, NY has one of the premier food science programs in the nation. The Cornell Food Venture Center and the Northeast Center for Food Entrepreneurship (NECFE) provide support and resources for hundreds of established and start up food processors in New York and neighboring states. (When I worked as a product developer for a local food processor I attended the Better Process Control School at Cornell to become certified in acidified and low acid food manufacturing.)

As far as the sauce goes, it was formulated 68 years ago by Dr. Robert C. Baker, Professor Emeritus and food scientist at Cornell University. Among his other innovations, Dr. Baker is credited with creating the chicken hot dog, turkey ham, and even the chicken nugget! But around here in upstate New York, Dr. Baker is most widely known for his now Famous Cornell Chicken. Dr. Baker’s original goal was to help local poultry farmers sell young chickens (known as broilers) as a source of meat since in the 50’s most people preferred to eat beef and pork while chickens were raised mainly as egg layers. 1950 Dr. Baker wrote a booklet for Cornell Cooperative Extension which in exacting detail taught people how to barbecue chicken, pork and beef using a charcoal “fireplace” to slow barbecue the chicken halves that were basted frequently with his barbecue sauce. From its introduction in 1950 to today thousands of Fire Stations, community organizations, churches, schools, and charities hold regular chicken barbecues as fund raisers based on Dr. Baker’s original plans and recipes.

The sauce itself is kind of unconventional. It isn’t tomato based like so many sauces today, and it contains raw egg which many people fear is an unsafe food practice. But because the sauce is kept under refrigeration and has so much vinegar (acid) and salt it prevents the possibility of salmonella from forming — remember this recipe was created by a famous food scientist. Another oddity is that the sauce was initially (and subsequently) used as a basting sauce only. That means that the sauce was applied frequently to the chicken during the entire cooking process. Many people, including myself, have used the sauce as a marinade before cooking, as well as a baste while cooking. My thinking is that I tend to cook the chicken quicker using my gas grill and it doesn’t have time to absorb all the flavor it would being slow barbecued and basted for more than an hour as originally intended. You should marinate for at least 4 hours up to overnight.

Also, when I make the sauce I keep 2 cups on the side and use the rest to marinate my chicken pieces. Then I can baste the chicken with fresh sauce when grilling and serve some as a dipping sauce when serving. The sauce is typically used to cook split broilers (1/2 chickens) but I prefer to cook quarters for ease in handling and portion size. Choose which ever cut of chicken works best for your family halves, quarters, breasts, thighs, drumsticks, etc. I used leg quarter because we are “dark meat” people, they’re economical, and the meat doesn’t dry out as much as breasts so it’s pretty forgiving if it gets overcooked a bit. That being said you never want to under cook your chicken — so be sure to use a instant-read or digital food thermometer to ensure the chicken has reached the safe temperature of 165 F or above.

Okay, now that you know the story and the method… time to start grilling!


Famous Cornell Chicken

Prep time:  10 minutes
Marinate time:  4 to overnight

Cook time:  45 to 60 minutes
Makes:  Enough sauce/marinade for 2 whole chickens

Ingredients:
2 cups Apple Cider Vinegar
1 cup Vegetable Oil
1 Whole Egg
3 TBSP Salt (you can reduce salt to 1 TBSP if needed)
1/2 tsp Fine Ground Black Pepper
1 TBSP Poultry Seasoning (I only use Bell’s)
4-6 lbs. Broiler Chicken halves or quarters


Directions:
1. In a blender container, combine the cider vinegar, oil, egg, salt, pepper, and poultry seasoning. Blend until emulsified. Measure out 2 cups sauce for basting and set aside.
2. Decide what cut of chicken you’ll be using. Rinse and pat dry with paper towels. Pierce the chicken pieces all over with a fork — this helps with the marinating.
3. Place the chicken in 1 or 2 large resealable plastic bag(s), pour in the remaining Cornell sauce, squeeze out excess air from bag and seal. Turn the bag(s) over a couple of times to distribute sauce evenly, then place in a shallow dish (to catch any possible leaks) and refrigerate for at least 4 hours up to overnight. If possible turn the bags over every couple of hours while marinating.
4. When ready to grill chicken, preheat your outdoor gas grill to medium heat and lightly oil the grates. Remove chicken from marinade and pat dry with paper towels (discard used marinade).
5. Place chicken on the grill skin side down — using a brush, baste the chicken with reserved sauce. Cook for about 7 minutes until skin has started to brown. Turn chicken over, baste again with sauce, and cook for another 7 minutes.
6. Turn the burners down to low and continue to cook chicken with the grill lid down, turning every 7-10 minutes and basting with sauce on every turn, for about 45 minutes or until an instant-read thermometer reads at least 165 F at the thickest part of the meat near the bone. (NOTE: Since every grill is different you need to watch the cooking process and deal with any flare ups to avoid burning the chicken.)
7. When chicken reaches the safe temperature, remove from grill to a platter, cover loosely with foil and allow to rest for 15 minutes before serving.
8. Serve with your favorite sides (we did ranch beans and coleslaw). Enjoy!


There you have it, Famous Cornell Chicken. I know the cooking process takes time but it should yield moist and juicy chicken with a crispy skin and an unmistakable flavor that only comes from this easy-to-make sauce and the low-and-slow grilling process. So in the last few days of “Indian Summer” I urge you to try this Upstate New York favorite.

Until next time remember, “The Sauce Makes the Difference!”

Antipasto

antipasto

Anyone that grew up in or around the Italian-American community surely encountered antipasto. Antipasto is traditionally the first course in an Italian meal. Antipasto most often consists of cured meats, cheeses, olives, pepperoncini (hot peppers), anchovies, mushrooms and pickled vegetables — served individually or combined into small plates or large family style platters. Antipasto can range from the simple and rustic to the extravagant.

In my family antipasto was reserved for Holidays and large gatherings. There were two ways antipasto was served…. first there was the elaborate salad presented on a large platter with a bed of greens topped with layer upon layer of salami, capicola, prosciutto, provolone, mozzarella, pepperoncini, olives, mushrooms, tomatoes, artichokes, eggplant, and giardiniera. (This, of course, might vary depending on what was available or the mood and budget of the preparer.) 

The other way antipasto was served was generally called “olive salad” and it was a combination of olives, pepperoncini, celery and onions, with chunks of provolone, salami or pepperoni. This salad was dressed with olive oil, red wine vinegar, oregano, and crushed red pepper. It was best served after a day or two of marinating… and this was one of my Dad’s favorites (and one of mine too).

At Lista’s Italian Cuisine we served a variation of the former, but rarely the latter (unless it was for a catered event). The restaurant menu featured an Antipasto Platter that was big enough to share. The original recipe card calls for a large dinner plate lined with chopped lettuce, topped with chick peas, ripe olives, pepperoncini, tomato wedges, onions, sliced beets, and eggplant then drizzled with our house made Italian dressing — this was topped with slices of pepperoni, salami, ham, mozzarella and provolone, and then it was garnished with a sprinkle of Pecorino Romano and an anchovy fillet. It was a real work of art when presented to the customer.

For this post I’m featuring the second type of antipasto or “olive salad” simply because I have recently been making this salad for my father-in-law who loves it even more than my Dad did. When I found out that my father-in-law was going to the grocery store weekly and paying about $9.00 a pound for olive salad, I decided to make it for him instead. Of course, when all is said and done I might have invested about that much myself — but the result was far superior and much more authentic to my family roots.

This recipe make a large quantity of antipasto since it calls for several components that come in 12 or 16 oz. jars (the easiest and most cost effective way to buy them). There are some fresh elements, and a couple of more expensive items — you can choose what you want to add to your version based on your own particular taste. My father-in-law and I like our antipasto on the hot and spicy side, but that can be dialed down by using little or no hot peppers.

So if you’re feeling adventurous and want to make a batch of antipasto salad for a family gathering or large dinner party try this recipe and my combination of ingredients…I think it has great flavor and balance and looks really nice presented on the table.


Dan’s Antipasto

Prep time:  30 minutes
Cook time:  15 minutes
Marinate time:  4 to 24 hours
Makes: about 12 cups

Ingredients:
2 stalks Celery – cut into 1 inch pieces
1 Yellow Onion – peeled and cut into 1 inch pieces
2 Carrots – peeled and sliced 1/2 inch thick
3-4 cloves Garlic – peeled
1/2 cup White Vinegar
1 tsp Salt
pinch Crushed Red Pepper
1 jar Pitted Kalamata Olives – drained

1 jar Pimento Stuffed Green Olives – drained
1 can Pitted Ripe Olives (California type) – drained
1 jar Pepperoncini – drained, stems removed and halved
1 jar Giardiniera Pickled Vegetables (hot or mild) – drained
1 jar Button Mushrooms – drained
1 can Quartered Artichoke Hearts – drained
1 jar Whole Roasted Red Peppers – drained and cut into 1 inch pieces
1/2 lb. Pepperoni Stick – cut into 1/2 inch half circles
1/2 lb. Hard Salami or Soppressata – cut into 1/2 inch dice
1/2 lb. Ham or Capicola or Prosciutto – cut into 1/2 inch dice
1/2 lb. Sharp Provolone (or Asiago) – cut  into 1/2 inch dice
1/2 lb. Mozzarella – cut into 1/2 inch dice
1/2 cup Olive Oil
1/4 cup Red Wine Vinegar
1 tsp Dry Oregano
1/2 tsp Crushed Red Pepper (optional)

Directions:
1. In a medium covered sauce pan combine the cut celery, onion, carrots and garlic cloves with white vinegar, salt, pinch red pepper and enough water to just cover vegetables. Bring to a boil and cook for 5 minutes. Remove from heat, cover and allow to stand in the hot liquid for another 10 minutes. Drain and rinse under cold water. Set aside.
2. In a large mixing bowl combine the next 8 ingredients (the jarred olives, etc.) that have been drained. Add the cooked celery mixture and toss to combine.
3. Add the diced meats and cheeses to the vegetables and toss to combine. In a small bowl whisk together olive oil, red wine vinegar, oregano and red pepper. Pour dressing over the antipasto salad and toss to coat. Cover an refrigerate for at least 4 hours up to overnight. Stirring occasionally if possible.
4. Before serving remove from refrigerator, stir to distribute dressing, spoon antipasto into a shallow serving dish and serve with tongs or a slotted serving spoon. Leftover antipasto can be kept in refrigerator in a tightly sealed container for up to one week.


There you have it, my version of Antipasto — a beautiful combination of colors, flavors and textures with a spicy kick and an authentic taste. This recipe makes a lot of antipasto but it keeps in the fridge for a 7-10 days. It’s a great item to share with others. I hope you find a reason to make this salad for your family and maybe it will become one of their favorites too.

Until next time remember, “The Sauce Makes the Difference!”

Zucchini “Lasagna”

So, as I may have mentioned before, I’m not much of a gardener. I have a tiny plot behind my house that we plant tomatoes, peppers, and zucchini each year hoping we’ll get a harvest. The problem is that no one in my house (including me) wants to do the work of taking care of the garden — so it gets weedy, overgrown, and just plain unruly.

Dan'sGarden2018
Dan’s Garden September 2018

The thing is that every year we dutifully weed the bed, hand-till it, compost it, plant it, water it… and forget-about-it! Still every year we seem to get at least some produce from the untended mess of plants — so every year we vow to do better at tending and cultivating our micro-farm. This year we planted late (again) and dealt with the early summer drought (and the lack of human attention) to gain several dozen really beautiful tomatoes, zero peppers, and about eight overgrown zucchini… I mean the giant, monster squash that comes from checking the garden only once every two weeks.

With all that being said, I still like to find a way of using these overgrown summer staples.

Which brings me to today’s post Zucchini “Lasagna.” This past week I’ve had four giant zucchini taking up room on my kitchen counter and I needed to do something with them. So I tried to pass them on… but most people I know around here have their own zucchini to bestow on others, so it was up to me.

I wanted to make something with sauce and cheese, so I decided to make a “lasagna” with my zucchini. I like the idea of baking the zucchini with ricotta and mozzarella layers to hold it together — my family voted for a ground beef layer, so I made the zucchini “lasagna” in the same fashion as traditional lasagna at Lista’s Italian Cuisine (see my post Lasagna Bolognese? from July 27, 2017). After slicing the zucchini, I layered it with sauce, ricotta cheese, meat sauce, and lots of mozzarella and Romano cheeses. Then baked it for about 90 minutes — let it set for another 30 minutes and topped it with a little more sauce and a sprinkle of grated Romano. Delizioso!

Please Note: my zucchini lasagna was a bit of a fail for me. It came out very watery after it was baked (you can see it in the last photo above). The problem was I didn’t slice the zucchini thin enough and I didn’t take time to prep the zucchini “noodles” with salt or heat to dry them out. After I let it rest for 30 minutes before serving, the moisture accumulated in the pan and I was able to lift out a slice and then carefully drain much of the water out of the pan (I did this 2-3 times while serving) so the servings held up nicely and the extra moisture was minimized. And overall it was very tasty and my family enjoyed it.

So after the fact I did a little reading and found some tips to avoid the moisture problem: 1. Slice your zucchini very thin (use a mandolin slicer) perhaps lengthwise… and layer the sliced zucchini on a double thickness of paper towels and lightly salt it (salt draws out moisture) and let it sit for several minutes. Then pat the slices dry with more paper towels before assembling the lasagna.
2. Another method is to bake the thinly sliced zucchini (with or without salting it) in the oven to dry it out before making the lasagna.
3. I read one recipe where the author added some dry quinoa to the bottom of the pan which will absorb some of the moisture. This method is appealing to me since I prefer not to use salt.

If, like me, you typically cook by experimentation then give one of the methods a try… or maybe you’ll discover your own way of avoiding the excess moisture.


Dan’s Zucchini “Lasagna”

Prep time: 40 minutes
Cook time: 60-90 minutes
Rest time: 30 minutes

Serves: 8-12

Ingredients:
2 extra large or 4 small Zucchini – sliced thin
1 lb. Ground Beef
1/2 med Onion – finely chopped
1/2 cup Seasoned Bread Crumbs (optional)
16 oz. Ricotta Cheese
2 Eggs
1 TBSP Dry Parsley Flakes
1 cup Grated Romano Cheese – divided
2 cups Shredded Mozzarella Cheese
4-6 cups Prepared Pasta Sauce – divided
Salt and Black Pepper – to taste

Directions:
1. Preheat the oven to 350 F with the rack in the center. Coat a 9×13 baking pan with cooking spray (like Pam).
2. Slice the zucchini very thin and remove some of the moisture using one of the methods mentioned above — or wing it like I did.
3. In a skillet, brown the ground beef and chopped onion over med-high heat until no longer pink. Drain and return to pan. Season with salt and pepper to taste, and add bread crumbs and 2 cups prepared sauce and stir to combine. Set aside.
4. In a medium bowl scramble the eggs, dry parsley, and 1/2 cup Romano together, stir in the ricotta cheese until thoroughly combined. Season with black pepper and set aside.
5. Layer the “lasagna” in the baking pan as follows: Spread one cup prepared sauce in the bottom of the baking pan. Layer sliced zucchini overlapping as needed to cover the bottom of pan. Spread the meat sauce mixture evenly over the zucchini, and sprinkle evenly with about 2/3 cup mozzarella. Add another layer of zucchini. Spread the ricotta cheese mixture evenly over top, and sprinkle another 2/3 cup mozzarella over the ricotta. Top with another layer of zucchini, spread the last cup prepared sauce over that and sprinkle the last 2/3 cup mozzarella over that. With your hand, press down the “lasagna” layers to make sure there are no air gaps.
6. Bake the “lasagna” uncovered in heated oven for 60-90 minutes until hot and bubbly and center reaches 180 F with a thermometer. Cover loosely with foil during last half of cooking if top gets too brown.
7. Remove from oven and allow to rest about 30 minutes before serving.
8. Cut “lasagna” portions with a sharp knife and lift out with a spatula. Top with additional pasta sauce and grated Romano cheese if desired.


There you have it, my Zucchini “Lasagna” — a great way to use up those giant zucchinis in your garden (or the ones your friend tries to pawn off on you). This recipe would work just as well with yellow summer squash, eggplant, or a combination.

Until next time remember, “The Sauce Makes the Difference!”